In our previous blog post, we look at how to bring your customers in from Xero and send off a Direct Debit mandate authorisation. Now that authorisation has been obtained from the customer, its time to use Directli to take payment for the invoices.
As mentioned in the previous blog post, Directli comes into a world of its own when there is a variable payment that needs to be taken by Direct Debit each month. So, the first stage of taking payments with Directli is to make sure that the invoice that requires payment has been entered into Xero and is marked as Authorised.
If you have entered new customers in Xero, then have a look at the first blog post that shows how to set up Xero customers in Directli.
In Direclti, the area that we are going to concentrate on is the Process Invoice/Bill area:

When this area is selected then you are able to search for transactions:

The top box give the option to search for transaction by Due Date or by Invoice Date and the from and to boxes allows you to select two dates. You can also leave this blank which will allow the selection of all invoices.
For example, you might want to select all invoices that are due today and take payment for them: Directli allows this. Once you select 'Get Invoices', Directli will dip into Xero and pull out all the invoices based on the selections. Directli will pull out all invoices, regardless of whether there is a Direct Debit mandate set up or not.
The presentation of the invoices in Directly is really very nice, clients are always commenting on how easy and clear it is to use:

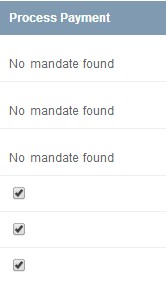
These are the main pieces of information you want to see when you are working out which invoice to pay off by Direct Debit. Underneath these fields, you will have data. The majority of the data will be read only, however the one that isn't is the most important field and that is 'Process Payment'. You are presented with a simple tickbox that automatically selects all invoices:

If the box is ticked, then the Direct Debit request will happen. If unticked it will not happen. So its a case of selection by exception, you can deselect the one or two that you do not want to take, maybe for this month the customer has already contacted you and made alternative arrangements.
Finally, the big green go button. When you are happy that you have the correct selection then at the bottom of the screen there is a green 'import' button. A simple click and you're done!
Now, if this wasn't awesome enough to make you think, "I need that!" then there are some parameters that make things super awesome.
So, what if you want to automatically send out Direct Debit mandate authorisation?
What if you want to automatically start the Direct Debit process?
Well, the answer is you can.
Under the Xero settings tab, you have two parameters that makes this possible:

The first of these settings is the payment processing option:

So, if you want to be in control of the process yourself select 'No Automation'. If you want to start the Direct Debit process on the invoice due date (you will receive the funds around 10 working days after the invoice due date) then select 'Auto Create on Invoice Due Date'. If you want to received the money 3 days after the due date the select the 'Auto create 4 days before the invoice due date'. Finally if you want to receive the payment 10 working days after the invoice date then select the final option of 'Auto create payment on invoice date'.
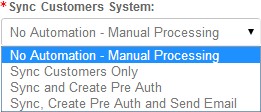
The second option is how you bring new clients from Xero into Directi, we discussed the manual way previously but it is possible to automate this:

So, you can just sync the customers. You can sync and create a Pre Auth (this will send an email overnight), or you could Synce the customer, create a pre Auth and also email that to the customer automatically.
We think that Xero, Directli and Go Cardless are an essential part of running your business. We love this solution for our business and we know our clients do too.


